하나의 응답에 대해 헤더를 설정하는 걸 원한다면 HttpServletResponse 또는 ResponseEntity 오브젝트를 사용 할 수 있다. 반면에, 우리의 목표가 전체 또는 다수의 응답에 필터를 추가하는 것이라면, 필터를 구성해야 한다.
2.1. HttpServletResponse 사용
단순히 HttpServletResponse 객체를 REST 엔드포인트에 인수로 추가한 다음, addHeader() 메소드를 사용하면 된다.
@GetMapping("/http-servlet-response")
public String usingHttpServletResponse(HttpServletResponse response) {
	response.addHeader("Baeldung-Example-Header", "Value-HttpServletResponse");
    return "Response with header using HttpServletResponse";
}
예제에 보이는 것처럼, 응답 객체를 반환 할 필요는 없다.
2.2. ResponseEntity 사용
이 경우에, ResponseEntity 클래스에 의해 제공되는 BodyBuilder를 사용하자.
@GetMapping("/response-entity-builder-with-http-headers")
public ResponseEntity<String> usingResponseEntityBuilderAndHttpHeaders() {
	HttpHeaders responseHeaders = new HttpHeaders();
    responseHeaders.set("Baeldung-Example-Header", "Value-ResponseEntityBuilderWithHttpHeaders");

    return ResponseEntity.ok()
    	.headers(responseHeaders)
        .body("Response with header using ResponseEntity");
}
HttpHeaders 클래스는 가장 일반적인 헤더를 설정하기 위한 많은 편리한 메소드를 많이 제공한다. GitHub repo에 이러한 요점을 보여주는 더 많은 예제를 볼 수 있다.
2.3. 모든 응답에 헤더 추가
이제 많은 엔드포인트에 특정 헤더를 설정하려고 한다고 생각해보자.
물론, 이전 코드를 각각의 매핑 메소드에 복제해야 한다면 실망스러울 것이다.
이를 달성하기 위한 더 좋은 방법은 서비스에 필터를 구성하는 것이다.
@WebFilter("/filter-response-header/*")
public class AddResponseHeaderFilter implement Filter {

    @Override
    public void doFilter(ServletRequest request, ServletResponse response, FilterChain chain) throws IOException, ServletException {
    	HttpServletResponse httpServletResponse = (HttpServletResponse) response;
        httpServletResponse.setHeader("Baeldung-Example-Filter-Header", "Value-Filter");
        chain.doFilter(request, response);
    }

    @Override
    public void init(FilterConfig filterConfig) throws ServletException {
    	// ...
    }

    @Override
    public void destroy() {
    	// ...
    }
}
@WebFilter 어노테이션은 이 필터가 적용될 url패턴을 나타내는 수 있게 한다.
아래와 같이 필터를 스프링이 검색 할 수 있게 하려면 스프링 어플리케이션 클래스에 @ServletComponentScan 어노테이션을 추가해야 한다.
@ServletComponentScan
@SpringBootApplication
public class ResponseHeadersApplication {

    public static void main(String[] args) {
    	SpringApplication.run(ResponseHeaderApplication.class, args);
    }
}
@WebFilter에 의해 제공되는 기능이 필요하지 않다면 필터 클래스에서 @Component 어노테이션을 사용해 이 마지막 단계를 피할 수 있다.
3. 반응형 엔드포인트를 위한 헤더
다시, ServletHttpResponse, ResponseEntity 또는 ServerResponse(기능적 엔드포인트의 경우) 클래스 및 인터페이스를 사용하여 단일 엔드포인트 응답에 헤더를 어떻게 설정하는지 볼 것이다.
모든 응답에 헤더를 추가하기 위해 스프링 5 WebFilter를 어떻게 구현하는지 배울 것이다.
3.1. ServerHttpResponse 사용
이 접근법은 HttpServletResponse 부분과 상당히 비슷하다.
@GetMapping("/server-http-response")
public Mono<String> usingServerHttpResponse(ServerHttpResponse response) {
	response.getHeader().add("Baeldung-Example-Header", "Value-ServerHttpResponse");
    return Mono.just("Response with header using ServerHttpResponse");
}
3.2. ResponseEntity 사용
비 반응형 엔트포인트와 마찬가지로 ResponseEntity 클래스를 사용할 수 있다.
@GetMapping("/server-http-response")
public Mono<ResponseEntity<String>> usingResponseEntityBuilder() {
	String responseHeaderKey = "Baeldung-Example-Header";
    String responseHeaderValue = "Value-ResponseEntityBuilder";
    String responseBody = "Response with header using ResponseEntity (builder)";

    return Mono.just(ResponseEntity.ok()
    	.header(responseHeaderKey, responseHeaderValue)
        .body(responseBody));
}
3.3. ServerResponse 사용
마지막 두 하위 섹션에 소개된 클래스와 인터페이스는 @Controller가 달린 클래스에서 사용될 수 있으나 새로운 스프링 5 기능적 웹 프레임워크에는 적합하지 않다.
HandlerFunction에 대한 헤더를 설정하고 싶다면 ServerResponse 인터페이스에 손을 대야 한다.
public Mono<ServerResonse> userHandler(final ServerRequest request) {
	return ServerResponse.ok()
    	.header("Baeldung-Example-Header", "Value-Handler")
        .body(Mono.just("Response with header using Handler"), String.class);
}
3.4. 모든 응답에 헤더를 추가
마지막으로, 스프링 5는 서비스가 검색한모든 응답에 헤더를 설정하는 WebFilter 인터페이스를 제공한다.
@Component
public class AddResponseHeaderWebFilter implements WebFilter {

    @Override
    public Mono<Void> filter(ServerWebExchange exchange, WebFilterChain chain) {
    	exchange.getResponse()
        	.getHeaders()
            .add("Baeldung-Example-Filter-Header", "Value-Filter");
		return chain.filter(exchange);
    }
}
4. 결론
결론적으로, 응답에 헤더를 설정하는 다양한 다른 방법을 배웠고, 또한 단일 엔드포인트에 설정하길 원하거나 모든 rest API를 구성하길 원하면, 반응형 스택에 마이그레이션하더라도, 이제 우리는 그 모든 것을 할 지식을 갖고 있다.
항상 그래왔듯, 비 반응형과 스프링 5 명세 기능을 사용한 것 둘 다 모든 예제는 깃헙 저장소에 있다.
"User-Agent" 헤더 필드는 요청에 기반한 사용자 에이전트에 관한 정보를 포함하며, 보고된 상호운용성 문제의 범위를 식별하고, 특정 사용자 에이전트 제한을 피하기 위해 응답을 조정하거나 재단하고, 브라우저나 운영체제 사용에 관한 분석을 위해 종종 서버에 의해 사용된다. 사용자 에이전트는 특별히 구성하지 않는 한 각 요청에 대하여 User-Agent 필드를 보내야 한다.
User-Agent = product * (RWS (product / comment))
User-Agent 필드-값은 하나 이상의 제품 식별자로 구성되어 있으며, 각각은 0개 이상의 주석 ([RFC7230] 섹션 3.2)이 있고, 사용자 에이전트 소프트웨어와 중요한 하위 제품을 함께 식별한다. 일반적으로 제품 식별자는 사용자 에이전트 소프트웨어를 식별하는 중요성에 대한 내림차순으로 나열되어있다. 각 제품 식별자는 이름과 선택적 버전으로 구성되어 있다.
product = token ["/" product-version]
product-version = token
발신자는 생산된 제품 식별자를 제품을 식별하는데 필요한 것으로 제한해야한다. 발신자는 제품 식별자 내에 광고나 기타 불필요한 정보를 생성하면 안된다. 발신자는 버전 식별자가 아닌 제품 버전 정보를 생성하면 안된다. (즉, 동일한 제품 이름의 연속 버전은 제품 식별자의 제품 버전 부분에서만 달라야 한다.)
예:
User-Agent: CERN-LineMode/2.15 libwww/2.17b3
사용자 에이전트는 불필요하게 세밀한 디테일을 사용자 에이전트 필드를 생성해서는 안되고, 제3자에 의한 하위제품의 추가를 제한해야된다. 너무 길고 자세한 사용자 에이전트 필드 값은 요청 지연과 원하는 바("지문")에 반하여 식별되는 사용자 리스크를 증가시킨다.
마찬가지로, 필드의 목적에 우회하므로 호환성을 선언하기 위해 다른 구현의 제품 토큰을 사용하지 않는 구현이 장려되어진다. 사용자 에이전트가 다른 사용자 에이전트로 가장하는 경우, 수신자는 실제 사용자 에이전트에서 제대로 작동하지 않더라도 식별된 사용자 에이전트에 맞게 조정된 응답을 의도적으로 보고 싶어한다고 가정할 수 있다.
스프링 메세지소스 튜토리얼은 스프링 어플리케이션에서 메세지소스를 사용하여 메세지를 번역하는 방법을 보여줄 것입니다.
스프링은 엔터프라이즈 어플리케이션을 만드는데 널리 사용되는 자바 어플리케이션 프레임워크입니다.
스프링 메세지소스
MesssageSource는 메세지의 매개 변수화 및 국제화를 지원하여 메세지를 해결하는데 사용됩니다. 스프링은 두 개의 내장 MessageSource 구현을 갖습니다. 바로 ResourceBundleMessageSoource와 ReloadableResourceBundleMessageSource입니다. 후자는 가상 머신의 재시작 없이 메세지 정의를 리로드 할 수 있습니다.
스프링 메세지소스 예제
다음 애플리케이션은 영어와 독일어 메세지를 포함하고 있습니다. 내장 ResourceBundleMesssageSource를 사용합니다.
현재 공부 중인 스프링 시큐리티에서 위임에 대한 내용이 나와 공부하는 도중에 상속과 위임의 관계에 대해서 Template Method 패턴에 등장한다고 하여 살펴보려합니다.
🙌 취지
Template Method는 상위클래스에 대한 알고리즘의 골격을 정의하는 행동 디자인 패턴이지만 서브클래스가 특정 알고리즘 스텝에 따라 그 구조를 바꾸지 않고 오버라이드 할 수 있게 합니다.
🤔 문제점
당신이 기업 문서를 분석하는 데이터 마이닝 어플리케이션을 만든다고 상상해보세요. 사용자는 다양한 포맷(PDF, DOC, CSV)으로 문서를 생산하고, 앱은 의미있는 데이터를 일정한 포맷으로 뽑아내려 합니다.
첫번째 버전은 DOC 파일일 경우에만 작동합니다. 다음 버전에는 CSV 파일도 지원합니다. 한달 뒤 당신은 PDF 파일로 데이터를 추출하는 방법을 "가르쳤습니다".
많은 중복된 코드를 포함하는 데이터 마이닝 클래스들
어느 시점에서, 당신은 이 세가지 클래스들이 많은 비슷한 코드를 갖고 있다는 것을 알아챘습니다. 다양한 포맷의 데이터를 다루는 코드는 각 클래스에서 완전히 다른 반면에, 데이터를 처리하고 분석하는 코드는 거의 동일합니다. 그렇다면 알고리즘 구조는 그대로 놔두면서 중복 코드를 제거하는게 더 낫지 않겠습니까?
이 클래스에 사용된 클라이언트 코드에 또 다른 문제점이 있습니다. 처리 객체의 클래스에 따라 적절한 조치를 취한 많은 조건이 있습니다. 만약 이 세 처리 클래스들이 공통 인터페이스나 기본 클래스를 갖는다면 당신은 클라이언트 코드에서 조건을 제거할 수 있고 처리 오브젝트에서 메소드를 호출할 때 다형성을 사용할 수 있습니다.
😊 해결책
Template Method 패턴은 알고리즘을 일련의 단계로 구분짓고 이 단계를 메소드로 바꾸고, 하나의 "템플릿 메소드" 안에서 이러한 메소드에 대한 일련의 호출을 넣는 것을 제안합니다. 이 단계는 추상적이거나, 일부 기본 구현이 있을 수도 있습니다. 알고리즘을 사용하기 위해 클라이언트는 자체 서브클래스를 제공해야 하고, 모든 추상 단계를 구현하고, 필요시(템플릿 메소드 자체에서는 아니지만) 어떤 선택적 단계를 오버라이드해야 한다.
이것이 우리의 데이터 마이닝 앱에서 어떻게 작동할지 봅시다. 우리는 모든 세개의 파싱 알고리즘에 대한 기본 클래스를 생성할 수 있습니다. 이 클래스는 다양한 문서 처리 단계에 대한 일련의 호출로 구성된 템플릿 메소드를 정의합니다.
Template method는 알고리즘을 단계별로 구분하여 서브클래스가 이 단계를 실제 메소드는 아니지만 오버라이드하게 합니다.
첫째, 모든 단계를 abstract로 선언합니다. 이는 서브클래스가 자체 구현을 이 메소드로 구현하게끔 합니다. 우리의 경우, 서브클래스가 이미 모든 필요한 구현을 하고 있기 때문에 우리는 상위클래스의 메소드에 맞게 메소드의 signature만 조정하면 됩니다.
이제, 중복코드를 없애기 위해 무엇을 해야하는지 봅시다. 파일 열기/닫기나 데이터 추출하기/파싱하기는 각각의 데이터 포맷마다 달라보입니다. 따라서 이 메소드들에 대해서는 건드릴 곳이 없습니다. 그러나 원시 데이터를 분석하거나 보고서 작성과 같은 다른 단계의 구현은 매우 비슷하므로 서브 클래스가 코드를 공유할 수 있게 기본 클래스로 가져올 수 있습니다.
보시다시피, 우리는 두가지 단계를 거칩니다 :
추상 단계는 모든 서브클래스에서 구현되어야 합니다.
선택적 단계는 이미 일부 기본 구현을 갖지만, 필요하다면 오버라이드 될 수 있습니다.
또 다른 단계가 있는데 hooks라 불립니다. hook는 바디가 비어있는 선택적 단계입니다. 템플릿 메소드는 hook이 오버라이드 되지 않아도 작동할 수 있습니다. 일반적으로 hook은 중요한 알고리즘 스텝 전이나 후에 위치되어, 추가적인 알고리즘 확장 포인트를 서브클래스에 제공합니다.
🚗 실세계에 비유
일반적인 건축 계획이 고객의 요구에 더 잘 맞도록 약간 변형될 수 있습니다.
템플릿 메소드적 접근은 대량 주택 건설에 사용될 수 있습니다. 표준 주택을 짓기위한 건축 계획은 몇가지 확장점들을 갖고 있고 소유자들이 결과 주택의 일부 세부사항을 조정할 수 있게 합니다.
토대를 다지고, 구조를 짜고, 벽을 세우고, 배선을 설치하고, 수도 및 전기를 연결하는 등의 각각의 건축 단계는 결과 주택을 다른 건물과 약간 다르게 만들며 약간의 변화가 있을 수 있습니다.
🔦구조
1. 추상 클래스(Abstract Class)는 특정 단계에서 이러한 메소드를 호출하는 실제 템플릿 메소드 뿐만이 아니라 알고리즘의 단계로 작동하는 메소드를 선업합니다. 이 단계는 추상적이거나 일부 기본 구현을 갖도록 선언 될 수 있습니다.
2. 구체적 클래스(Concrete Classes)는 모든 단계를 오버라이드 할 수 있지만 그것은 템플릿 메소드는 아닙니다.
# 짜가코드
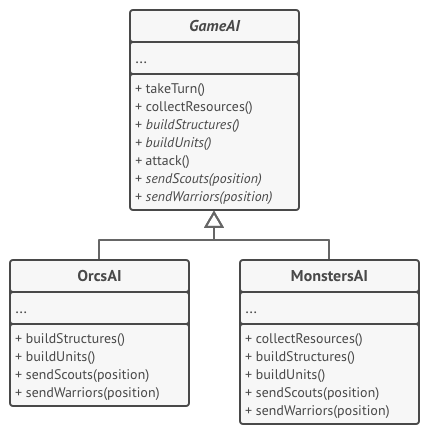
이 예제에서, Template Method 패턴은 간단한 전략 비디오 게임에서 다양한 인공지능 분기에 대한 "골격"을 제공합니다.
간단한 비디오 게임의 AI 클래스들
게임의 모든 종족은 거의 같은 유닛과과 건물을 가지고 있습니다. 그러므로 당신은 동일한 AI 구조를 여러 종족에서 재사용하며, 약간의 디테일만 다르게 오버라이드 할 수 있습니다. 이 방법을 사용하여, 당신은 오크 AI를 좀 더 공격적으로 재정의 할 수 있고, 휴먼은 좀 더 방어적으로, 몬스터는 건축을 할 수 없게 만들 수 있습니다. 게임에 새 종족을 추가하려면 새로운 AI 서브클래스를 만들고 기본 AI 클래스에 선언된 기본 메소드를 재정의해야 합니다.
/*
추상 클래스는 일반적으로 기본 작업을 추상화하기 위해 호출로 구성된 일부 알고리즘 골격을 포함하는 템플릿 메소드를 정의합니다. 구체적 서브 클래스는 이 작업을 구현하지만, 템플릿 메소드 자체는 그대로 둡니다.
*/
class GameAI is
	//템플릿 메소드는 알고리즘의 뼈대를 정의합니다.
	method turn() is
    	collectResources()
        buildStructures()
        buildUnits()
        attack()

    //일부 단계는 기본 클래스에서 바로 구현될 수도 있습니다.
    method collectResources() is
    	foreach (s in this.buildStructures) do
        	s.collect()

   	//그리고 몇몇은 추상적으로 정의되어 집니다.
    abstract method buildStructures()
    abstract method buildUnits()

    //클래스는 여러 템플릿 메소드를 가질 수 있습니다.
    method attack() is
    	enemy = closestEnemy()
        if (enemy == null)
        	sendScouts(map.center)
        else
        	sendWarriors(enemy.position)

    abstract method sendScouts(position)
    abstract method sendWarriors(position)

/*
구체적 클래스는 기본 클래스의 모든 추상 작업을 구현해야 하지만 템플릿 메소드 자체를 재정의해서는 안됩니다.
*/
class OrcsAI extends GameAI is
	method buildStructures() is
    	if (there are some resources) then
        	//농장을 짓고, 막사를 짓고, 요새를 건설합니다.

    method buildUnits() is
    	if (there are plenty of resources) then
        	if (there are no scouts)
            	//보병을 만들고 정찰 그룹에 추가합니다.
            else
            	//대원을 만들고 전사 그룹에 추가합니다.

    // ...

    method sendScouts(position) is
    	if (scouts.length > 0) then
        	// 그 위치로 정찰을 보냅니다.

    method sendWarriors(position) is
    	if (warriors.length > 5) then
        	// 그 위치로 전사를 보냅니다.

// 서브클래스는 기본 구현으로 일부 조작을 재정의할 수 있습니다.
class MonstersAI extends GameAI is
	method collectResources() is
    	// 몬스터는 자원을 모으지 않습니다.

	method buildStructures() is
    	// 몬스터는 구조물을 건축하지 않습니다.

	method buildUnits() is
    	// 몬스터는 유닛을 생산하지 않습니다.
💡 적용
클라이언트가 알고리즘의 어떤 특정 단계만을 확장하고 전체 알고리즘이나 구조는 확장하지 못하게 하고 싶을 때 템플릿 메소드를 사용합니다.
템플릿 메소드는 획일적 알고리즘을 상위클래스에서 정의된 구조는 그대로 유지하면서 서브클래스에 의해 쉽게 확장되는 일련의 개별 단계로 전환 할 수 있습니다.
거의 동일한 알고리즘을 포함한 여러 클래스가 있는 경우 이 패턴을 사용합니다. 그 결과로, 당신은 알고리즘을 변경할 때 모든 클래스를 수정해야할 수도 있습니다.
이러한 알고리즘을 템플릿 메소드로 전환하면, 당신은 상위클래스로 유사한 구현 단계를 끌어 올려 코드 중복을 제거할 수 있습니다. 하위클래스마다 다른 코드는 하위클래스에 남아있을 수 있습니다.
📋 구현 방법
단계적으로 쪼갤 수 있는지 대상 알고리즘을 분석합니다. 어떤 단계가 모든 서브 클래스에 공통인지 어떤 단계가 고유한지를 고려합니다.
추상 기본 클래스를 만들고 알고리즘 단계를 나타내는 템플릿 메소드와 추상 메소드 집합을 선언합니다. 해당 단계를 실행하여 템플릿 메소드의 알고리즘 구조를 윤곽짓습니다. 하위클래스에서 오버라이드하는걸 방지하기 위해 템플릿 메소드를 final로 설정하십시오.
모든 단계가 추상적이어도 괜찮습니다. 그러나 일부 단계는 기본 구현으로 이점을 얻을 수 있습니다. 서브클래스가 이러한 메소드를 구현할 필요가 없습니다.
알고리즘의 중요 단계 사이에 hook을 추가하는 걸 고려하십시오.
알고리즘의 각 변형에 대해 새 구체적 서브클래스를 작성하십시오. 모든 추상 단계를 구현해야하지만, 일부 선택적 단계를 오버라이드 할 수도 있습니다.
⚖ 장단점
✔ 당신은 클라이언트가 커다란 알고리즘의 특정 부분만 오버라이드하게 하여 알고리즘의 다른 부분에서 발생하는 변경의 영향을 덜받게 할 수 있습니다.
✔ 당신은 중복 코드를 상위클래스로 당겨올 수 있습니다.
❌ 일부 클라이언트는 제공된 알고리즘 골격에 의해 제한될 수 있습니다.
❌ 당신은 하위 클래스를 통한 기본 단계 구현를 억제하여 Liskov 대체 원칙을 위반할지 모릅니다.
❌ 템플릿 메소드는 더 많은 단계를 갖게 될 수록 유지하기 어려운 경향이 있습니다.
🐱🏍 다른 패턴과의 관계
팩토리 메소드는 템플릿 메소드의 전문화입니다. 동시에 팩토리 메소드는 큰 템플릿 메소드의 단계 역할을 할 수 있습니다.
템플릿 메소드는 상속에 기반합니다. 하위클래스에서 해당 파트를 확장하여 알고리즘의 일부를 변경할 수 있습니다. 전략은 구성을 기반으로 합니다. 당신은 해당 동작에 해당하는 다른 전략을 제공하여 오브젝트 동작의 일부를 변경할 수 있습니다. 템플릿 메소드는 클래스 레벨에서 작동하며, 정적(static)입니다. 전략은 개체 수준에서 작동하므로 런타임시 동작을 전환할 수 있습니다.
</> 코드 예제
이 예제에서, 템플릿 메소드 패턴은 소셜 네트워크 알고리즘을 정의합니다. 특정 소셜 네트워크와 매치되는 서브클래스는 소셜 네트워크에서 제공하는 API를 따라 이 단계를 구현합니다.
📁 networks
📄 networks/Network.java: Base social network class
package com.test.example.networks;

/**
 * Base class of social network.
 *
 */
public abstract class Network {
	String userName;
	String password;

	Network() {}

	/**
	 * Publish the data to whatever network.
	 */
	public boolean post(String message) {
		// Authenticate before posting. Every network uses a different authentication method.
		if (logIn(this.userName, this.password)) {
			// Send the post data.
			boolean result = sendData(message.getBytes());
			logOut();
			return result;
		}
		return false;
	}

	abstract boolean logIn(String userName, String password);
	abstract boolean sendData(byte[] bytes);
	protected abstract void logOut();
}
📄 networks/Facebook.java: Concrete social network
package com.test.example.networks;

/**
 * Class of social network
 *
 */
public class Facebook extends Network {
	public Facebook(String userName, String password) {
		this.userName = userName;
		this.password = password;
	}

	@Override
	public boolean logIn(String userName, String password) {
		System.out.println("\nChecking user's parameters");
		System.out.println("Name: " + this.userName);
		System.out.print("Password: ");
		for (int i=0; i<this.password.length(); i++) {
			System.out.print("*");
		}
		simulateNetworkLatency();
		System.out.println("\n\nLogin success on Facebook");
		return true;
	}

	@Override
	public boolean sendData(byte[] data) {
		boolean messagePosted = true;
		if (messagePosted) {
			System.out.println("Message: '" + new String(data) + "' was posted on Facebook");
			return true;
		} else {
			return false;
		}
	}

	@Override
	public void logOut() {
		System.out.println("User: '" + userName + "' was logged out from Facebook");
	}

	private void simulateNetworkLatency() {
		try {
			int i = 0;
			System.out.println();
			while (i < 10) {
				System.out.print(".");
				Thread.sleep(500);
				i++;
			}
		} catch (Exception e) {
			e.printStackTrace();
		}
	}
}
📄 networks/Twitter.java: One more social network
package com.test.example.networks;

/**
 * Class of social network
 *
 */
public class Twitter extends Network {

	public Twitter(String userName, String password) {
		this.userName = userName;
		this.password = password;
	}

	@Override
	public boolean logIn(String userName, String password) {
		System.out.println("\nChecking user's parameters");
		System.out.println("Name: " + this.userName);
		System.out.print("Password: ");
		for (int i=0; i<this.password.length(); i++) {
			System.out.print("*");
		}
		simulateNetworkLatency();
		System.out.println("\n\nLogin success on Twitter");
		return true;
	}

	@Override
	boolean sendData(byte[] data) {
		boolean messagePosted = true;
		if (messagePosted) {
			System.out.println("Message: '" + new String(data) + "' was posted on Twitter");
			return true;
		} else {
			return false;
		}
	}

	@Override
	protected void logOut() {
		System.out.println("User: '" + userName + "' was logged out from Twitter");

	}

	private void simulateNetworkLatency() {
		try {
			int i = 0;
			System.out.println();
			while (i < 10) {
				System.out.print(".");
				Thread.sleep(500);
				i++;
			}
		} catch (Exception e) {
			e.printStackTrace();
		}
	}
}
📄 Demo.java: Client code
package com.test.example;

import java.io.BufferedReader;
import java.io.IOException;
import java.io.InputStreamReader;

import com.test.example.networks.Facebook;
import com.test.example.networks.Network;
import com.test.example.networks.Twitter;

/**
 * Demo class. Everything comes together here.
 *
 */
public class Demo {
	public static void main(String[] args) throws IOException {
		BufferedReader reader = new BufferedReader(new InputStreamReader(System.in));
		Network network = null;
		System.out.print("Input user name: ");
		String userName = reader.readLine();
		System.out.print("Input password: ");
		String password = reader.readLine();

		// Enter the message.
		System.out.print("Input message: ");
		String message = reader.readLine();

		System.out.println("\nChoose social network for poasting message.\n" +
					"1 - Facebook\n" +
					"2 - Twitter");
		int choice = Integer.parseInt(reader.readLine());

		// Create proper network object and send the message.
		if (choice == 1) {
			network = new Facebook(userName, password);
		} else {
			network = new Twitter(userName, password);
		}
		network.post(message);
	}
}
📄 OutputDemo.txt: Execution result
Input user name: hong Input password: 1234 Input message: Hello, World!
Choose social network for poasting message. 1 - Facebook 2 - Twitter 2
Checking user's parameters Name: hong Password: **** ..........
Login success on Twitter Message: 'Hello, World!' was posted on Twitter User: 'hong' was logged out from Twitter